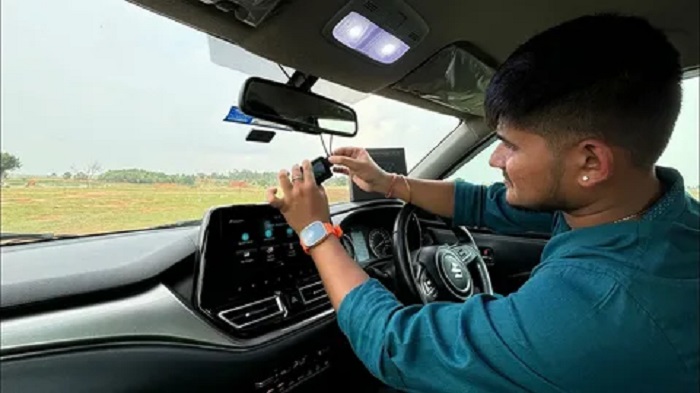
Installing a dash cam can look deceptively simple. Mount the camera on the windshield, connect a power cable, and start recording.
Technically, that may be enough to make the camera work. A good installation, however, requires a little more thought.
The camera needs a clear view of the road without obstructing the driver’s vision. Power cables should be routed neatly rather than hanging across the dashboard. A rear camera adds another long cable to manage, while parking mode may require a completely different power arrangement.
The good news is that a basic front-facing dash cam is one of the more approachable automotive electronics projects for a careful DIY installer.
The key is to plan the installation before sticking anything permanently to the windshield.
Start by Understanding Your Dash Cam Setup
Before removing adhesive backing or routing cables, identify what kind of system you are installing.
A basic setup may include only:
- one front camera,
- a windshield mount,
- a power cable,
- and a 12V or USB power adapter.
A dual-channel system adds a rear camera and a cable running from the front of the vehicle to the rear windshield.
More advanced systems may also include:
- an interior camera,
- GPS module,
- hardwire kit,
- external battery pack,
- or additional accessories.
The number of components determines how complicated the installation will be.
A front-only camera powered from a 12V socket can be relatively straightforward. A multi-channel camera with hardwired parking mode requires considerably more planning.
Choose the Mounting Position Before Attaching the Camera
Where the dash cam sits affects both recording quality and driver visibility.
A common position for the front camera is high on the windshield near the rear-view mirror.
This location has several advantages.
The camera can maintain a clear forward view while remaining relatively unobtrusive from the driver’s seating position. It also places the power cable close to the headliner, which makes cable routing easier.
Before attaching the mount permanently, sit in the normal driving position and check that the camera will not interfere with your view.
Also check the camera’s preview screen or mobile app, when available, to confirm that the lens has a clear view of the road.
The objective is to capture useful road footage without turning the camera itself into a distraction.
Check Local Windshield Rules
Dash cam mounting regulations are not identical everywhere.
Some jurisdictions restrict where objects can be attached to a windshield or how much of the driver’s field of view they may occupy.
Because these requirements vary, check the applicable rules where the vehicle is registered and driven.
This is another reason a small, high mounting position near the mirror is often practical, provided it complies with local regulations.
Clean the Windshield Before Mounting
Adhesive mounts work best on a clean surface.
Before installation, remove dust, fingerprints, oils, and other residue from the selected area.
Allow the glass to dry completely before attaching the adhesive pad.
Do not rush this step.
A poorly prepared surface can cause the mount to loosen later, particularly when the windshield experiences temperature changes.
Once the adhesive is applied, give it the amount of setting time recommended by the mount or dash cam manufacturer.
Test the Camera Position Before Finalizing It
Adhesive mounts can be difficult to reposition cleanly.
Before removing the protective backing, hold the camera approximately where you intend to mount it.
Power it temporarily if necessary and inspect the live view.
Check several things:
Is the horizon reasonably level?
Can the camera see enough of the road?
Is too much dashboard or sky filling the image?
Is the lens blocked by the rear-view mirror or windshield tint?
Can the driver still see clearly?
Small adjustments are much easier before the adhesive touches the glass.
Plan the Power-Cable Route
A dangling power cable is one of the clearest signs of a rushed dash cam installation.
Before routing anything, identify the power source.
For a simple setup, this may be the vehicle’s 12V accessory socket or a suitable USB power source.
Then plan a cable path from the camera to that location.
A common route is:
camera → headliner → A-pillar area → lower dashboard/trim → power source
The exact route depends on the vehicle.
The objective is to keep the cable secure, unobtrusive, and away from controls or moving components.
Use the Headliner Carefully
The small gap between the windshield and headliner often provides a convenient path for the power cable.
A plastic trim tool can help guide the cable into position without scratching interior surfaces.
Avoid using sharp metal tools that could damage trim, wiring, or upholstery.
Do not force the cable into a gap that is obviously too tight.
A neat installation should not require damaging the vehicle’s interior.
The A-Pillar Requires Extra Attention
This is one of the most important parts of the installation.
Many modern vehicles have airbags located around the A-pillar.
A cable should not be routed in a way that could interfere with airbag deployment.
Do not simply push wiring behind trim without understanding what is underneath it.
Vehicle designs differ substantially, so consult the vehicle manufacturer’s documentation when necessary.
If the intended route passes through an area containing airbags and you are uncertain how to route the cable safely, professional installation is the better option.
A hidden cable is not worth compromising a safety system.
Route the Cable Toward the Power Source
Once past the A-pillar area, continue routing the cable through suitable trim toward the power connection.
Keep the cable away from:
- pedals,
- steering components,
- gear controls,
- seat tracks,
- sharp edges,
- and other moving parts.
Avoid leaving loose cable where passengers can catch it with their feet.
If there is excess cable, secure it in an appropriate location rather than stuffing it randomly behind panels.
The final result should look intentional rather than improvised.
Start With a 12V-Socket Installation if You Want Simplicity
For many drivers, the easiest power arrangement is the vehicle’s 12V accessory socket.
The basic workflow is straightforward:
mount camera → route cable → connect adapter → start vehicle → confirm recording.
This avoids modifying the vehicle’s electrical system.
The main downside is that the power adapter and part of the cable may remain visible around the socket.
Whether the camera continues receiving power after the ignition is switched off depends on the vehicle.
This becomes important if you want parking-mode recording.
Hardwiring Is a Different Level of Installation
Hardwiring connects the dash cam to the vehicle’s electrical system, usually through an appropriate fuse-box connection and compatible hardwire kit.
Drivers often choose this approach for two reasons:
a cleaner installation and parking-mode power.
But it is more involved than plugging a camera into a 12V socket.
A hardwire installation can require identifying suitable circuits, using the correct fuse taps, grounding the system appropriately, and configuring low-voltage protection where supported.
If you are uncomfortable working with automotive electrical systems, use a qualified installer.
A basic plug-in dash cam installation is an accessible DIY project. Electrical modifications should not be treated with the same casual approach.
Understand Parking Mode Before Hardwiring
Parking mode allows compatible dash cams to perform certain recording functions while the vehicle is parked.
Depending on the camera, this might include:
- impact-triggered recording,
- motion detection,
- time-lapse recording,
- buffered event recording,
- or continuous low-bitrate recording.
But the camera needs power after the vehicle is switched off.
RoadLens’ current installation resources distinguish between a hardwire kit drawing from the vehicle battery and a dedicated battery pack that isolates parking recording from the starter battery.
If parking mode matters to you, decide how it will be powered before completing the installation.
Otherwise, you may end up routing the same cables twice.
Installing a Rear Camera Requires More Cable Planning
A dual-channel dash cam adds rear coverage but also increases installation complexity.
The rear camera is commonly mounted high on the rear windshield.
The connecting cable then needs to travel from the front camera to the rear of the vehicle.
A typical route follows interior trim or the headliner.
RoadLens’ rear-camera installation guide recommends positioning the rear unit high and centered and leaving appropriate cable slack near moving tailgate hinges where applicable.
SUVs, hatchbacks, and vehicles with opening tailgates can require more planning because the wiring needs to accommodate movement.
Do not route a cable so tightly that opening the hatch repeatedly pulls on the connector.
Be Careful Around Side-Curtain Airbags
Rear-camera wiring can pass through several areas containing safety equipment.
Again, side-curtain airbags deserve particular attention.
Do not place a cable where it could restrict or alter airbag deployment.
Vehicle-specific routing matters here.
If trim removal is required and you are uncertain about the location of airbags, wiring harnesses, or clips, consult appropriate service information or use a professional installer.
Install the Memory Card Before the Final Test
A dash cam needs compatible storage before it can record reliably.
Check the manufacturer’s specifications for:
- supported microSD capacity,
- speed-class requirements,
- endurance recommendations,
- and formatting instructions.
Install the card and format it according to the dash cam manufacturer’s procedure when required.
Then verify that the camera recognizes the card without errors.
Do not assume that a powered-on camera is necessarily recording correctly.
Configure the Basic Settings
Before considering the installation finished, review the camera settings.
Important items may include:
Date and time
Accurate timestamps make recordings easier to organize and interpret.
GPS-equipped cameras may synchronize time automatically, depending on the model.
Resolution
Confirm that the intended recording resolution is selected.
Loop recording
Check that continuous loop recording is configured according to your preference.
Audio
Decide whether cabin audio recording is appropriate and legal where you drive.
G-sensor sensitivity
If adjustable, excessively high sensitivity may cause ordinary bumps to create too many protected files.
Parking mode
Configure it only after confirming that the required power arrangement is installed correctly.
Check the Camera View Again
Now start the vehicle and inspect the live image.
Look at the horizon and road coverage.
The camera should capture the road rather than spending a large percentage of the frame recording the hood or sky.
For a rear camera, check that the image is also level and appropriately centered.
RoadLens’ installation overview recommends testing recording and adjusting the viewing angle before completing the cable routing.
This is much easier than discovering an alignment problem after every cable has been hidden.
Record a Short Test Drive
A stationary preview cannot reveal everything.
Take a short drive and then review the footage.
Check:
- image orientation,
- road coverage,
- vibration,
- reflections,
- audio if enabled,
- timestamps,
- front/rear synchronization,
- and whether files are being stored normally.
Also listen for rattling from cables or trim.
A cable that looks secure while parked may move when the vehicle travels over rough roads.
Confirm the Dash Cam Starts Automatically
For most installations, you want recording to begin without requiring manual intervention every time you drive.
Turn the vehicle off, wait as appropriate, and then restart it.
Confirm that the camera powers on and begins recording as expected.
If it does not, investigate the power source and settings before considering the installation complete.
Keep Cables Away From Driver Controls
This deserves repeating because appearance is not the only reason to hide wiring.
Loose cables should never interfere with:
steering, pedals, gear controls, parking brake, displays, or the driver’s field of view.
A clean installation is also a safer installation.
Cable management should therefore be treated as part of the functional setup rather than cosmetic finishing.
Know When DIY Installation Stops Making Sense
A simple front dash cam connected to an accessory socket can be manageable for many vehicle owners.
Professional installation becomes more attractive when:
- hardwiring is required,
- the fuse box is difficult to access,
- airbags complicate cable routing,
- several cameras need to be installed,
- interior trim requires significant disassembly,
- the vehicle has a complex electrical system,
- or you are uncertain about any safety-related step.
There is nothing gained by turning an inexpensive DIY project into an expensive electrical or interior repair.
A Simple Installation Checklist
Before finishing, verify:
Camera mounted securely?
Driver’s view unobstructed?
Camera angle level and centered?
Power cable securely routed?
Cable clear of airbags?
Cable clear of pedals and moving components?
Memory card recognized and formatted?
Correct date and time?
Loop recording working?
Rear camera recording, if installed?
Parking mode configured correctly, if used?
Camera automatically starts with the vehicle?
Test footage reviewed?
If all of these items are confirmed, the installation is probably ready for everyday use.
A Clean Installation Starts With Planning
Installing a dash cam is not primarily about finding somewhere to stick a camera.
It is about creating a recording system that has a clear view, reliable power, appropriate storage, and safe cable routing.
For drivers preparing for a DIY installation, this step-by-step guide on how to install a dash cam covers the basic mounting, cable-routing, power, and testing process in a focused format. The same RoadLens installation section also includes separate guides for hardwiring, hiding cables, rear-camera installation, mounting position, and parking-mode setup.
Take a few minutes to plan the camera position and cable path before beginning. Test everything before finalizing the installation, and do not improvise around airbags or vehicle electrical systems.
The cleanest dash cam installation is usually the one you barely notice once you start driving.